Editing Schedules
The Edit Schedule dialog consists of five tabs that allow you to configure various aspects of the schedule.
The Test button at the bottom of the Edit Schedule dialog allows you to test execution of the schedule at any time. Clicking Test executes all configured tasks for the schedule immediately, using your own permission settings.
Warning: If you have configured the Email task for a schedule, please be certain that you intend to send the test output to the recipient(s) specified in the To field. If you are testing a production schedule, you may wish to replace the list of recipients with your own email address.
If a "Run As" user has been specified in MAPS for this schedule or if a system-level user has been specified for running all schedules, when the schedule runs it will execute as the designated user instead of as your own user. This user may have different permissions for the database than you do. You should contact your institution's MAPS administrator if you have a question regarding schedule permissions.
See also:
General
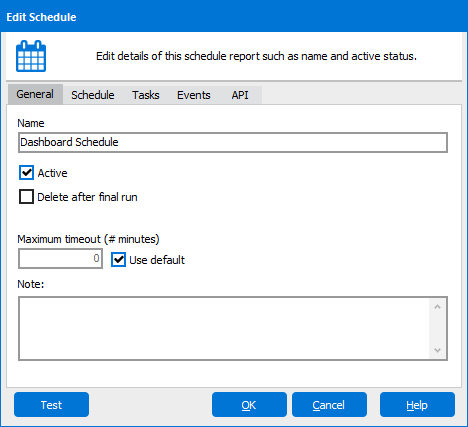
The General tab allows you to give the schedule a name, make the schedule active, and specify if this schedule is to be deleted after it runs for the last time (if a last date is specified).
If the Active box is not checked, this schedule will never execute. If you are still testing a schedule, you may wish to uncheck this box while it is in development.
Note: It is very important to give your schedule a descriptive name. As multiple schedules are put into production, it becomes very difficult to administer them in MAPS if they all have the same name.
Schedule
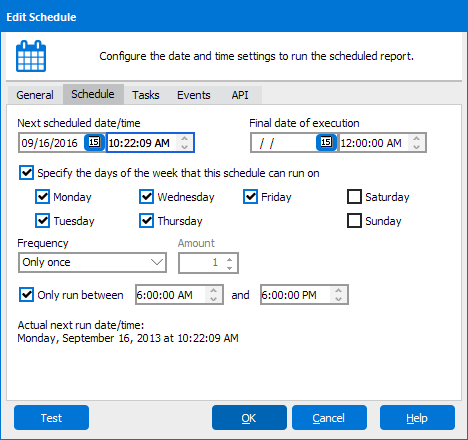
The Schedule tab allows you to control when a schedule will run:
- Next scheduled date/time - Select the next date and time that the schedule will run. Note: Schedules execute based on the timezone of the server where MAPS is installed; if your local machine uses a different timezone, you may wish to adjust the scheduled time accordingly. You should choose a next scheduled date/time in the future, as the schedule will execute immediately upon saving if you enter a date/time that has already passed.
- Final date of execution - Select the last date and time that the schedule should run.
- Specify the days of the week that this schedule can run on - This check box will allow you to specify on which day(s) the schedule is permitted to run. Note that this does not necessarily mean that the schedule will run on that day, only that it is permitted to do so.
- Frequency - This determines how often the schedule will run. You have the following options:
- Only once
- Every day - Increments the run date by one day.
- Every week - Increments the run date by one week.
- Twice per month - The first execution date is determined by the time you setup the schedule. From that point forward the run time is determined by the following logic: If the first execution date was in the first half of the month, the next execution date is determined by adding half of the days in the month to the first execution date. If the first execution date falls in the second half of the month, the next execution date is determined by incrementing the date to the end of the month, then adding half the days of the following month.
- For example, if the first execution date is set at 6/10, the next execution date would occur on 6/25 (15 days after the first execution date). For the succeeding months the jobs would then run on the 10th and 25th of each month.
- Similarly, if the first execution date is set at 6/20, the next execution date would occur on 7/15 (incrementing the first execution date to the end of the month then adding 15 days). Jobs would then run on the 15th and 20th of each succeeding month.
- Every month - Increments the run date by one month. This selection has an additional option, "From the end of the month". Checking this box will calculate the next run date based on an offset from the end of the month. For example, if the next scheduled date is Feb 28th, checking this box will cause the run date after that to be March 31st instead of March 28th.
- Twice per year - Increments in the same manner as Twice per month except the term is by year rather than by month.
- Every year - Increments the run date by one year.
- # of minutes - Increments the run date by the specified number of minutes.
- # of hours - Increments the run date by the specified number of hours.
- # of days - Increments the run date by the specified number of days.
- # of weeks - Increments the run date by the specified number of weeks.
- # of months - Increments the run date by the specified number of months. This selection has an additional option, "From the end of the month". Checking this box will calculate the next run date based on an offset from the end of the month. For example, if the next scheduled date is Feb 28th, and the month increment is 3, checking this box will cause the run date after that to be May 31st instead of May 28th.
- # of years - Increments the run date by the specified number of years.
- Only run between [time] and [time] - Specify the times that the schedule is permitted to run. This option can be used to configure, for example, a schedule that runs every hour between 8 AM and 5 PM. When not checked, schedules may run at any time.
- Amount - Choose the increment of time to elapse between schedule runs. For example, if # of minutes is selected and Amount was set to 5, then the schedule will run every 5 minutes.
- Actual next run date/time - displays the next scheduled run date and time.
Tasks
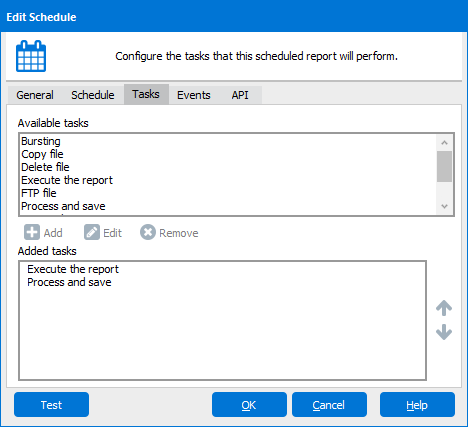
The Tasks tab allows you to control the events performed during execution of a schedule. The Execute the report and Process and save tasks are added by default since they are required in order for the schedule to do anything. The following tasks are available:
| Available Tasks | Description |
|---|---|
| Bursting | Bursting allows you to separate out the report into several individual reports. |
| Copy file | Copies the output file from the schedule to a location on the network. |
| Delete file | Delete a file from a location on the network. |
| Execute the report | Brings up the parameter entry form so you can select the parameters needed for the execution of the report (if necessary). |
| FTP file | FTP the report results to a specified destination. |
| Process and save | Choose the output format for the report. You can choose from the following options:
|
| Run application | Execute an application such as a batch file. |
| Save execution state | Save the data as it was at the time the report was run so that it can be reproduced exactly as it was at that time. When you run the report, you will be prompted to select which saved execution state you would like to use. You can manage the Saved Execution States when you edit the report. |
| Send an Email | Send an email and distribute the report to other users. The report will be sent out in the output type selected in the Process and save task. |
Tasks execute in the order specified, from top to bottom. To add a task from the Available tasks, double-click the task, or select the task and click the Add button. After entering the configuration details for that task, it will appear in the Added tasks list and will execute when the schedule runs.
Events
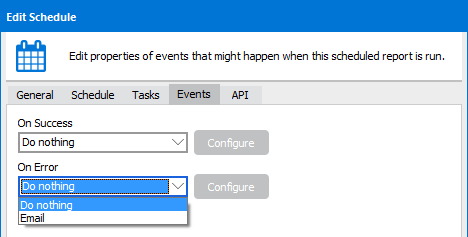
The Events tab allows you to specify an event to perform upon success or failure of a scheduled report. You can either send an email or do nothing for each condition. When opting to send an email, use the Configure button to configure the email.
API
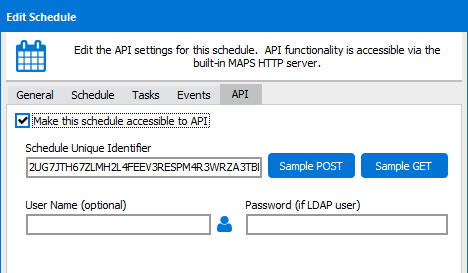
The API (Application Programming Interface) tab allows Argos administrators to make a report accessible via the Argos API. The information on this tab is only visible to administrators. An API accessible report can be called without having to log into Argos. The call can be made from a web page, portal or other 3rd-party application. Note that a MAPS administrator must specifically identify the servers that are permitted to make API calls to Argos. This is performed in the MAPS Config on the HTTP Referrers screen.
API calls can use a variety of techniques to authenticate users. One option is to pass the username and password on the API call. Another option is to enter the username and password on this form (password only required if user is LDAP).
For more information, please refer to the Argos API page.
| Option | Description |
|---|---|
| Make this report accessible to API | Set this checkbox to make this report API accessible. Once the checkbox is marked, MAPS will generate a Report Unique Identifier for the report. |
| Password | If the default user is an LDAP user, you must assign a password here or pass in the password via the API call. |
| Report Unique Identifier | Identifies the report. This will be one of the parameters passed in an API call to MAPS. If the report or the DataBlock are moved or copied, a new Report Unique Identifier will need to be generated. |
| Sample GET | Clicking on the Sample GET button will copy an example of the HTML GET code to the clipboard that can then be placed in a web page. |
| Sample POST | Clicking on the Sample POST button will generate an example of the HTML POST Form in its simplest form. POST forms can also be created to have checkboxes, listboxes, drop down boxes and other controls. The API call in POST form will be copied into your Windows clipboard for later use. |
| User Name | A default username and password for this report may be defined here. If there is a username and password that is passed in via the GET, POST form, it will override the username and password entered here. |
Copying Schedules
You can copy a schedule within a report, or from one report or DataBlock to another. Copying a schedule preserves all of that schedule's settings, with the exception of the "Active" checkbox and the API settings.
When copying a schedule to a different report or DataBlock, it is very important to verify that all of the settings are still correct under the new location. In particular, if you copy a schedule from one report type to another, you may need to edit the various tasks to make sure any generated files have the correct file extension. For example, when copying a schedule from a banded report to a CSV report, you will need to adjust the file extension in the "Send an Email" task from .pdf to .csv.
Similarly, if you copy a schedule from one DataBlock to another you may need to edit the "Execute the report" task to use parameters from the new DataBlock.