Data Connections
The Data Connections screen is where you configure the connections to the data sources you wish to use in the MAPS applications (Argos, FormFusion, and IntelleCheck). The MAPS applications do not connect directly to the databases themselves; they instead request the data from MAPS, which performs the database queries and returns the data. This means that the end users do not need to install any database providers on their local machines.

What is a Data Connection?
MAPS can use ADO (ActiveX Data Object) connections, native Oracle or MSSQL database drivers, the Cloud Connector, or the Salesforce connector to connect to data sources. The data connection is where you specify how MAPS should connect to each data source. You will need to create a data connection for each data source that you would like to use with the MAPS applications.
You can connect to many different data source types, including databases, flat files, web data connectors, and other objects. For ADO connections, the only requirements are that an OLE DB provider is available for the data source, and the data source can be queried using SQL.
Some examples of the databases you can connect to include:
- Microsoft SQL Server (native support or ADO)
- Oracle (native support or ADO; see Installing/Updating the Oracle OLE DB Provider for download links and instructions.)
- IBM DB2
- Microsoft Access
- SQLite
- Salesforce
- Other SQL-based databases
Most databases have their own client or OLE DB provider. There are also third party authors of OLE DB providers if you cannot find one for the database you are working with.
If you cannot find an OLE DB provider for your database, but have a working ODBC connection, you can also use the Microsoft OLE DB Provider for ODBC Drivers.
Note: After installing a database provider on the MAPS server, you must reboot the machine in order for the provider to be recognized.
Creating and Configuring Data Connections
IMPORTANT NOTE: You MUST add or edit ADO connections from the machine where MAPS is installed, either by logging on to the machine directly or via a Remote Desktop session, and launching the MAPS Configuration from there. Any ADO providers that you want to use must be installed on this machine. When selecting a provider in the ADO connection setup, the providers shown are those local to the machine you are working on. If you try to add or edit an ADO connection from a machine other than the server where MAPS is installed, the connection will fail because it is looking for a local provider instead of the one installed on the MAPS server. If you are using native database drivers instead of ADO connections, these can be edited from any machine, and will use the database driver installed on the MAPS server.x
Reminder:You may need to consult with your Database Administrator to obtain appropriate configuration information for each data connection.
To create a new data connection, select the Add Connection button at the top of the Data Connections screen.
On the Connection Type screen of the Add Data Connection dialog, select the type of database you will be connecting to.
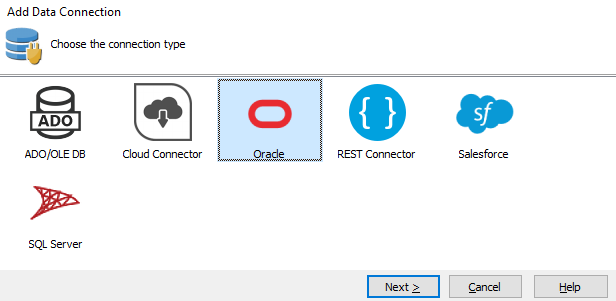
- ADO/OLE DB - Use an installed OLE DB provider to connect to the data source.
- Cloud Connector - Connect to a third-party data source or web application that provides a RESTful API which returns JSON data. Queries are run against a cached copy of the data. Requires a script specific to the API.
- ODBC - Integrate with the ODBC driver to retrieve data from various data sources in one standardized interface, regardless of the database type or vendor. using this connector, no conversion between OLE-DB to ODBC is required.
- Oracle - Use the native Oracle driver to connect to an Oracle database.
- Postgres - Integrate with Postgres databases. This connection provides a solution for users moving away from Oracle-based systems. When using the Postgres Data Connection type, MAPS will embed the necessary driver technology directly into all MAPS Servers. This eliminates the need for a separate ODBC driver installation on Windows systems.
- REST Connector - Connect to a third-party data source or web application via a RESTful API which returns JSON or XML data. Query filters can be mapped to API parameters so the request contains only data that is needed each time it runs.
- Salesforce - Use the optional Salesforce connector to connect to your Salesforce environment.
- SQL Server - Use the native SQL Server driver to connect to an MS SQL database.
Note: You can use an ADO/OLE DB connection for Oracle and SQL Server databases if desired, although the native database drivers may provide better performance and stability.
If the connection you selected is not already installed, click Install to download and install it. Otherwise, select Next to proceed.
On the General screen, enter the Connection Name that you wish users to see for this connection. You may also choose to add some notes for the connection. The notes are only visible in MAPS.
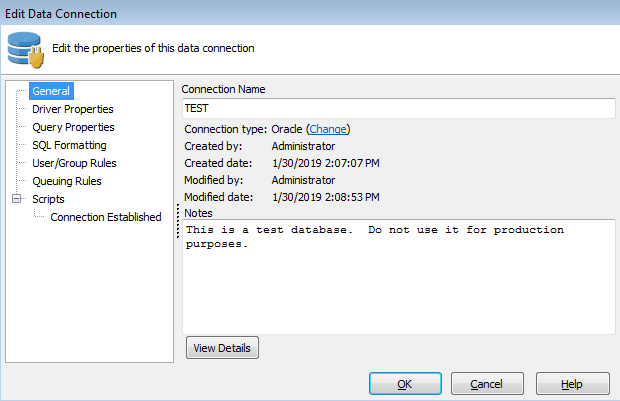
The View Details button displays driver details such as provider name, driver files, version number, client and session info, and more.

The Driver Properties screen is where you configure various properties for the database driver. The available properties differ depending on the connection type.
Enter the Oracle Home you wish to use, or leave it set to <default> if your server has only one Oracle Home. The Service Name is the name of the Oracle database you wish to use. Clicking into this field displays a dropdown menu containing a list of all databases in your tnsnames.ora file. You can also type the service name in manually.

You can opt to specify a username and password at the connection level, or leave it blank depending on how you decide to configure your user/group rules later on. The most basic method of connection is to enter a username and password here that all users who use this connection will use to access the database.
Enter the name of the server and database that you wish to use.

You can opt to specify a username and password at the connection level, or leave it blank depending on how you decide to configure your user/group rules later on. The most basic method of connection is to enter a username and password here that all users who use this connection will use to access the database.
Enter the Data Source, the name of the Database, and select a Driver. Under Advanced you may enter additional driver properties if needed (example: SQLServer Databases require a Server name field in order to configure).
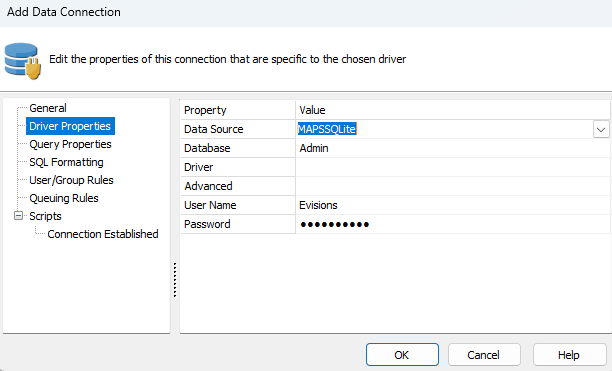
You may also opt to specify a username and password at the connection level, or leave it blank depending on how you decide to configure your user/group rules later on. The most basic method of connection is to enter a username and password here that all users who use this connection will use to access the database.
On the Driver Properties screen you may enter the name of the server and database that you wish to use.
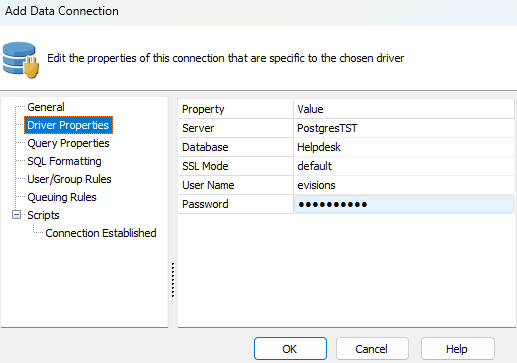
You may also opt to specify a username and password at the connection level, or leave it blank depending on how you decide to configure your user/group rules later on. The most basic method of connection is to enter a username and password here that all users who use this connection will use to access the database.
SSL Mode
SSL (Secure Socket Layer) authentication is the process of verifying the security between a user and server.
- Disable - Use a non-SSL connection.
- Allow - An SSL connection will only be attempted after a failed non-SSL connection attempt.
- Prefer - A non-SSL connection will only be attempted after a failed SSL connection attempt. This is the default setting.
- Require - Requires an SSL connection. If a root CA file is present, it will be verified in the same manner as the Verify-ca option.
- Verify-ca - Use an SSL connection with a CA-issued server certificate.
- Verify-full - Use an SSL connection with a CA-issued server certificate, and also verify that the server hostname matches the one in the certificate.
More information regarding PostgreSQL can be found in the PostgreSQL SSL Support Documentation.
Important Note
CA-issued server certificates must reside in the following location on the MAPS server:
If you are setting up a REST Connector to pull in third-party data, please refer to the REST Connector documentation for configuration details.
If you are setting up a Cloud Connector to pull in third-party data, please refer to the Cloud Connector documentation for configuration details.
If you are setting up a connection to a Salesforce environment, please refer to the Salesforce Connector documentation for configuration details.
When you first create a data connection, it is configured using the default query properties. If you are experiencing problems with a particular connection, you may need to work with your DBA to customize these values. Not all providers support all properties, so use care when changing these settings.
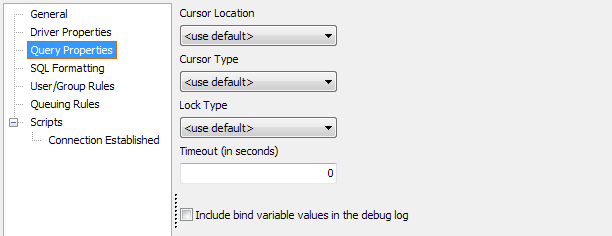
Some applications allow you to override the query properties within the application. For example, in Argos, you can modify these settings for an individual DataBlock.
Cursor Location
The Cursor Location determines where the data is stored while the database cursor is open for a query. The default value is "Use Server".
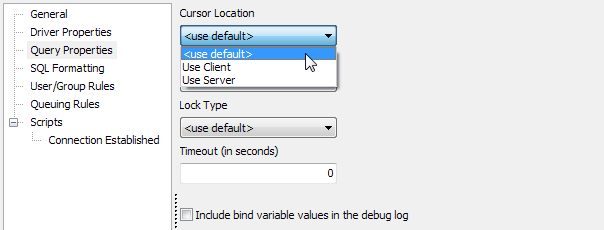
In this case, the "client" is the machine where MAPS is installed, and the "server" is the machine where the database is located.
The data in a client-side cursor is considered "inherently disconnected" from the database. The data connection retrieves the results of the query (all rows) and copies the data to the client before you can start using it.
The “Use Server” cursor location will retrieve only the required records, requesting more from the server as the user browses the data. Server-side cursors are useful when inserting, updating, or deleting records. This type of cursor can, in some cases, provide better performance than the client-side cursor. This is especially true in situations where excessive network traffic is a problem or if the query is retrieving large amounts of data.
You should consider a number of factors when choosing a cursor type such as: whether you are performing data updates or just retrieving data, the number of records being returned, and factors determined by your environment. Other factors might restrict you as well. Some data providers automatically scale the Cursor Type and Cursor Location properties, while others generate an error if you use an unsupported Cursor Type or Cursor Location.
Cursor Type
The Cursor Type specifies how you move through the data and whether changes made to the database are visible in the recordset after you retrieve it. The default value is "Open Forward Only".
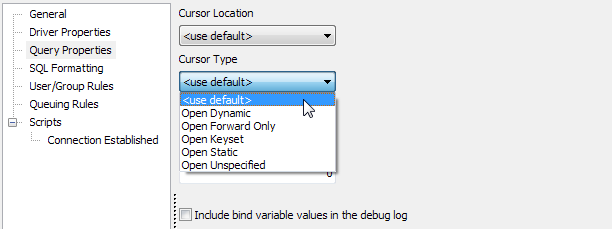
Dynamic - Allows you to view additions, changes and deletions by other users, and allows all types of movement through the recordset. Choose dynamic cursors if multiple users insert, update, and delete rows in the database at the same time. For Argos, there should not be a need to ever use the Open Dynamic Cursor Type.
Keyset - Behaves like a dynamic cursor, except it prevents you from seeing records other users add, and prevents access to records other users delete. Data changes by other users will still be visible. It allows all types of movement through the recordset. Again, unless only updates are being done, there is no need to use Open Keyset for Argos.
Static - Provides a static copy of a set of records for you to find data or generate reports. It always allows bookmarks and therefore allows all types of movement through the recordset. Additions, changes, or deletions by other users will not be visible.
Forward only - Behaves identically to a dynamic cursor, except it allows you to scroll only forward through records. This improves performance in situations where you need to make only a single pass through a recordset.
Lock Type
The Lock Type property tells the provider what type of locks should be placed on records during editing. Locking can prevent one user from reading data that is being changed by another user, and it can prevent a user from changing data that is about to be changed by another user. The default value is "Lock Read Only".
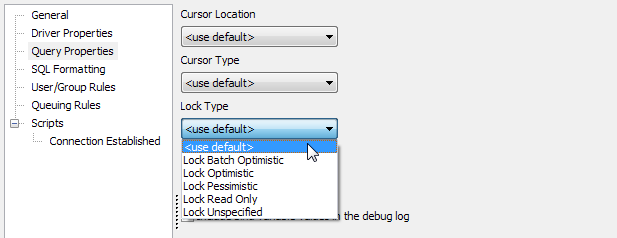
The Lock Type does not normally need to be modified since most of the time users are running read-only queries. You would only want to consider changing these settings if you are doing massive updates, deletes, or inserts.
Optimistic - Optimistic locking locks the record only when it is physically updated. This type of locking is useful in conditions when there is only a small chance that a second user may update a row in the interval between when a cursor is opened and the row is finally updated. The current values in the row are compared with the values retrieved when the row was last fetched.
Pessimistic - Pessimistic locking locks each record while it is being edited. This option creates an exclusive lock on the row when the user makes any change to any column in the record.
Read Only - Read only locking simply does not allow data editing. This lock is useful in conditions where your application must temporarily prevent data changes, but still can allow unrestricted reading. Read only locking with Cursor Type set to Forward Only is ideal for reporting purposes.
Batch Optimistic - Batch Optimistic locking is used with disconnected recordsets. These recordsets are updated locally and all modifications are sent back to the database in a batch.
Timeout
This is the timeout when running a query to wait for the first result. By default, MAPS waits 30 seconds for a query to begin returning results. This property allows the value to be changed at the connection level.
Include Bind Variable Values in Debug Log
If this box is checked, queries that appear in the debugging log will also include a line showing the value of each bind variable used in the query. This can assist in troubleshooting queries that are not performing as expected.

An extra line will print in the log file for each bind variable in the query. You should leave this option unchecked when not debugging, to prevent the log file from becoming overly large.
The SQL Formatting screen is where you specify the database format to use for communications via this data connection. You must select the correct SQL formatting options in order for queries to execute correctly. These options are used when generating queries in the Argos Visual Designer and for parsing queries in Argos and FormFusion.
You can choose from five predefined formats, define a custom format, or attempt to have MAPS choose the correct format. Whenever possible, you should choose the exact format for your database. The predefined settings include ANSI SQL-92, Jet, Microsoft SQL Server, Oracle, and Unidata.
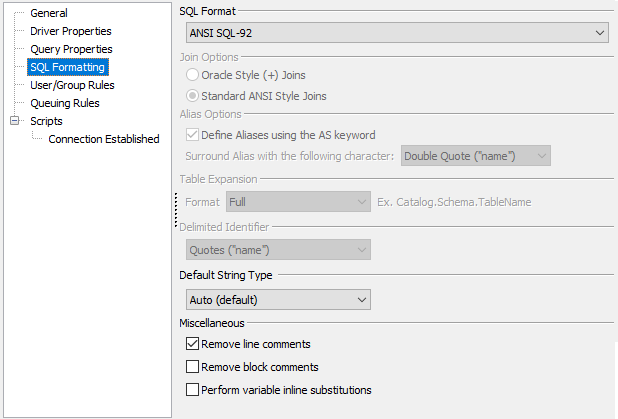
If you choose the custom format, you can specify each option associated with the SQL Format:
Join Options
- Oracle Style (+) Joins - queries use Oracle style joins using (+) notation.
Ex:
select * from spriden, spraddr
where spriden.spriden_pidm = spraddr_spraddr_pidm(+) - Standard ANSI Style Joins - queries use standard ANSI style joins.
Ex:
select * from spriden
left outer join spraddr on spriden_pidm = spraddr_pidm
Alias Options
- Define Aliases using the AS keyword - use "as" to create aliases, instead of just a space between the field and the alias.
Ex: select spriden.spriden_id as myalias - Surround alias with the following character (single quote/double quote/none) - indicate that aliases should be surrounded by single quotes, double quotes, or no quotes.
Ex: select spriden.spriden_id as "myalias"
Table Expansion Format - determines how tables should be referenced in the query.
- Table Name - Use only the name of the table.
Ex: select * from spriden - Schema + Table Name - Use the schema name followed by the table name.
Ex: select * from saturn.spriden - Full - Use the catalog name, schema, and table.
Ex: select * from thecatalog.theschema.thetable
If the table does not have a catalog, the catalog will be omitted. I.e., using "Full" table expansion for the spriden table would result in:
select * from saturn.spriden
since there is no catalog for this table.
Delimited Identifier
- Quotes or Brackets - choose whether quotes or brackets should be used as the delimiter for schema, table, and column names that contain spaces or special characters.
Ex: select [my table name].column from [my table name]
Default String Type
- Auto (Default), Narrow, or Wide - choose the option for the string type supported by your database.
Regardless of the SQL format, you may also specify the following miscellaneous options:
Remove line comments - strips comments prefaced with -- before running the query.
Remove block comments - strips comments contained between /* and */ marks before running the query.
Perform variable inline substitutions - determines the data type that will be returned when SELECTing from a DataBlock control field (list box, drop down, date edit box, etc.). This is primarily used to control the format in which MAPS returns dates. In MAPS 3.2 and earlier, dates were always returned as strings (e.g. ‘10/08/2001’). This meant that DataBlock Designers would have to use the TO_DATE function to change it back into DATE format. This option was added to the data connection in MAPS 3.5 to allow administrators to control the date format on a per-connection basis. If the box is not checked (default), MAPS will preserve dates in DATE format. If you have developed many DataBlocks in earlier versions of MAPS/Argos, you may wish to check the box to avoid having to update all of your DataBlocks to remove the TO_DATE function calls.
The User/Group Rules screen is where you authorize users and groups to use this data connection, and specify how each user or group will connect.
When you first create a data connection, the "Everyone" group is automatically added, and is set to use the "connection username and password" that you specified on the Driver Properties screen. The Everyone group contains all users who have been added to MAPS, either individually or as part of an LDAP group. You should give the Everyone group the lowest level of permissions you want to give any user, since it is not possible to remove a user from this group. You can, however, remove the Everyone group from the data connection. This would be the same as leaving the Everyone group in place but setting it to "Not allowed to connect".
For each user or group that you would like to establish permissions for, click the Add User  or Add Group
  button at the bottom of the screen to browse for the user or group. Select the user or group, then assign them the desired connection settings and permissions using the options on the right.
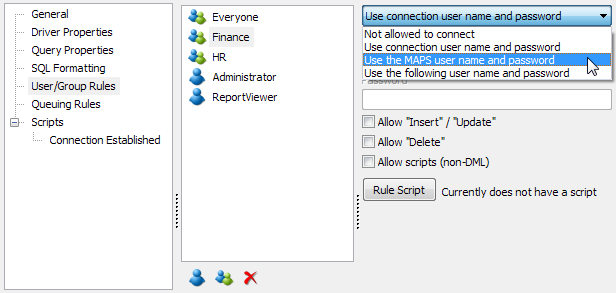
Database Credentials
Not allowed to connect – the user or group specified is not allowed to log in to the database. This option can be used to limit access to production data or other sensitive environments.
Use connection username and password – everyone in this user or group will connect using the database credentials that you specified in the connection string when setting up the driver properties. If you have specified a userid that has access to all of the data required for the MAPS applications (e.g. an "Evisions" user or similar), this is an easy way of allowing access.
Use the MAPS username and password – users will log in to the database using the same credentials that they use to log in to MAPS. If the MAPS username and password are not recognized by the data source, the user will see a login prompt giving them an opportunity to sign in with the correct database credentials.
Note: If you would like the user to be prompted for database credentials each time they connect, select the option to "Use the MAPS user name and password". If the user's MAPS credentials and database credentials match, they will be logged in automatically; otherwise, they will be prompted for the correct database credentials. Users logging in with SSO and LDAP users who are not able to save their passwords will always be prompted to log in to the database.
Use the following user name and password – this is similar to using the connection user name and password, but here you can specify a username and password with more limited access. For example, the connection username might have SELECT capability on ALL the tables. Using this option, you could specify a database user that has limited access to only the tables containing data that this user or group requires access to.
Some ERPs, such as Banner 9, support use of a proxy account such as BANPROXY to authenticate to the database. If your institution uses such an account, you can reference it in the username field. For example, if your proxy account is called "banproxy" then you would enter banproxy[$($User.Name)] to connect to the database using the banproxy account with the current user as the proxy user.
If you have defined custom fields on the Advanced screen of the user configuration (for MAPS users) or on the Attribute Names screen of the LDAP server configuration (for LDAP users), you can reference these fields in the Username field by entering $User.CustomField1, $User.CustomField2, or $User.CustomField3.
Primary Groups
If the Primary group selection is enabled in from the Groups tab in MAPS Config, and a primary group is defined for that user in Argos, then MAPS will attempt to use the primary group's sign in credentials rule when connecting to the data source. If a group does not exist in the User/Group Rules list, then MAPS will select a rule at random based on your existing groups from the User/Group Rules list.
Example: In the image above the Finance group is selected. This group's sign in credentials rule is defined as Use the MAPS user name and password. So, when the Finance group is defined as a user's primary group in Argos, connecting to this data source will only follow the sign in credentials rule associated with the Finance group, instead of selecting one at random.
Optional Permissions
For each user or group you added, you can choose to allow them to insert or update records, delete records, and/or run scripts (non-DML statements) for this data source. There are some situations in which you will need to allow certain users to run scripts-- for instance, for the user specified in the FormFusion configuration files if your institution is licensed for the FormFusion ScriptDirector module.
Note that these options do NOT assign these permissions at the database level-- they merely allow or prohibit them at the connection level. It is the database credentials that you supply here (or on the Driver Properties screen) that ultimately determine what data the end users have access to. If you want a particular user to be able to update records in the database via this data connection, you must check the Allow Insert/Update box as well as ensuring that the database user they are connecting as has the appropriate permissions. If you are not sure what permissions a database user has, consult with your DBA for advice.
Rule Scripts
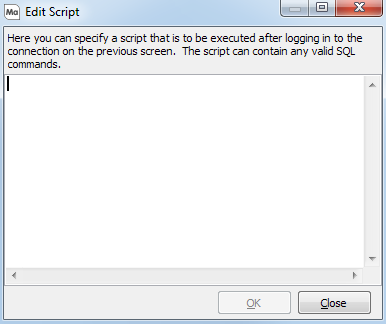
The Rule Script option allows you to execute a script each time a specific user or group uses the data connection. You can use it to enter a different script for each user or group that you add to the connection on the User/Group Rules screen.
To add a rule script, click the Rule Script button and enter the script in the dialog box.
You can find some sample scripts in the
MAPS Security Overview for Argos document on the Evisions website.
Important Note About Connections
Connecting to a data source requires a single set of credentials (username and password). If you have users who are members of multiple groups, and these groups connect using different database credentials, MAPS is forced to select one set of credentials to log them in to the database. You should be careful when adding groups to a data connection to ensure that you do not have users in this situation. When in doubt, you can add an individual user to the data connection to ensure that they always connect as you intend. Rules created for individual users always supersede the rules created for any groups that user is a member of.
MAPS gives you the ability to limit how many queries can be submitted to the database, based on time and day of week. This can be used to ensure that MAPS does not place too many SQL calls to your database during peak usage hours. Click Queuing Rules to configure the rules.

At this point no rules yet exist. Click the Add button to create a Queuing Rule.
The following dialog box will be displayed. Select the day(s) and times during which you would like to limit connections.
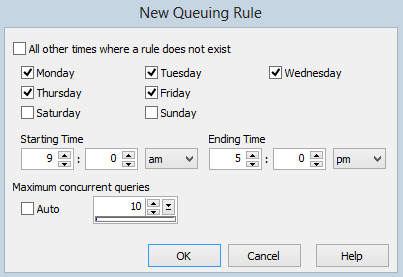
After setting up the queuing rules, you should set up a default rule that covers all other times where a rule does not exist.
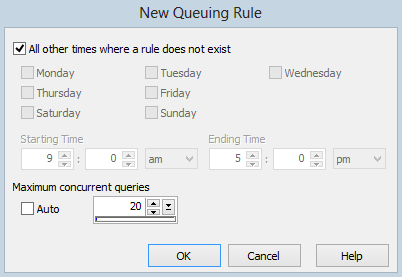
MAPS Queuing works as follows: As requests from users come into the MAP Server, it will monitor established queuing rules and will never allow the server to exceed the maximum number of concurrent SQL queries.
In this example, we have specified that there will be no more than 10 concurrent MAPS SQL operations allowed Monday thru Friday between the hours of 9:00 a.m. - 5:00 p.m. If 15 people simultaneously submit a request, the first 10 will be submitted immediately. The remaining five requests will be placed into a queue where they are submitted individually as the others finish. Note that 20 concurrent users are allowed at times where a rule does not exist.
In other words, per your rules, MAPS will never submit more than 10 operations to the SQL engine at a time. Furthermore, by design, any of the users that end up in a queue are sorted based on their Queue Priority. This is assigned when you create the user’s account in a prior section of this guide. In this way, people with a higher queue priority are moved to the front of the line with regard to who gets priority SQL service.
When complete, the SQL Queuing rules should look like this:

The Scripts screen allows you to enter a database script that is executed each time this data connection is used. This can be used to call a security function, set a default role, enable logging, etc. When you click the Script option, you will see a blank form in which you can edit a script.
For more information on how to use this feature, refer to the MAPS Security Overview for Argos document on the Evisions website.

Creating Connection Groups
Connection groups are optional groups for your data connections. If you have a large number of Oracle connections, for instance, you may wish to group them in a connection group so that you can quickly see that each of these connections is connecting to an Oracle database without needing to include "Oracle" in the name of the connection. Using connection groups makes it easier to find the connection you are looking for when working in an application, since they are sorted by type.
You can choose any name for your connection groups; it does not need to be the database type. You could have a group of development data connections, a group of connections for IntelleCheck only, etc.
To add a connection group, click the Add Group button. Then, edit the name of the connection group as desired.

You can add data connections to a connection group by selecting the group and clicking Add Connection. You can also drag and drop existing data connections into the connection group.
Authorizing Data Connections and Groups for use with Applications
In order to use a data connection with a particular MAPS application, you must authorize the connection for use with that application. Select the data connection that you wish to authorize. Then, in the Authorized for use with pane on the right, either right-click in the pane or use the Add Application button to select one or more applications to use this connection with.

You can also authorize an entire connection group for use with particular applications. Authorizing a connection group gives the same application permissions as authorizing each of the individual data connections within the group, and may be more efficient if you have large numbers of data connections.
Note: Authorizing a data connection for use with an application only authorizes the application-- not any users or groups-- to use that connection. You must also authorize the appropriate users and groups within the connection itself (see above).
Testing the Data Connection
There are two Test buttons that you can use when adding or modifying a data connection to ensure that your configuration is correct.
- The Test Connection button, found on the Data Link properties dialog, is used when creating an ADO connection string to test that the database users that were entered into the connection string are able to connect to the database.
- The red Test button at the top of the screen is used to verify that the connection settings are correct, the database provider is running, and that you can connect to the database.
If this test fails and you believe the configuration is correct, make sure that the database provider is installed on the MAPS server, that the server has been rebooted since the provider was installed, and that if you are using ADO, you have performed the ADO connection setup from the machine where MAPS is installed (either directly or via Remote Desktop). You can also check to see whether you can connect to the database using outside tools such as Toad or PL/SQL Developer. If you are trying to connect to an Oracle database, you should ensure that the tnsnames.ora file on the MAPS server includes your target database, and that the PATH to tnsnames.ora is correct.
If you are having difficulty with any of these steps or have questions about configuring your data connections, please open a HelpDesk case and we will be glad to assist you.