64-Bit MAPS
MAPS is now available in both 32-bit and 64-bit versions. Checking for updates in an existing 32-bit environment will keep you on the 32-bit version. For new installations, you can choose whether to install 32-bit or 64-bit. We recommend using the 64-bit version, which has better performance and can take advantage of more system resources.
Migrating Existing MAPS Installations to 64-Bit
If you have an existing 32-bit installation of MAPS you must provision a new server for 64-bit MAPS, and then migrate your existing data and configuration information to the new server. Instructions are provided here for that process.
- Refer to the MAPS Suite Hardware and Software Requirements to verify that your new server system meets or exceeds these specifications.
- As with any updates, verify the MAPS 64-bit installation in a test environment prior to switching to the server for production.
Overview - Please Read
The process of updating your institution's MAPS server to MAPS 64-bit involves a number of steps, and it is important that you perform the steps in the order provided. The main process consists of the following steps:
- Updating the current 32-bit server to MAPS 6.5. This ensures that all of the files that will be eventually copied to the new MAPS server are compatible.
- Installing MAPS on the new 64-bit server.
- Moving various data and configuration files from the old 32-bit server to the new 64-bit server.
- Testing and verifying that the new system is functioning as expected.
If you have any questions, or encounter problems during the process, contact Evisions Support and we will be glad to assist.
Update the Existing MAPS Server (32-bit) to MAPS 6.5 (32-bit)
You must update the version of MAPS installed on the current server even though you may be retiring the 32-bit server. Both the existing MAPS server and the new 64-bit MAPS server must be running exactly the same MAPS version before you migrate the data and configuration files. Be sure that the build version on both servers is the same.
- On the 32-bit server currently in use, select the Check for Updates button to update to the latest version of MAPS 6.5.
- Once the update completes, stop the MAPS service on the 32-bit server.
- Open the Services application (from Windows).
- Locate the Evisions MAPS Service in the list of services and select Stop from the context menu.
- If you are going to continue using the existing server while you test the new server, be sure to restart the service after copying the files to the new server.
Install MAPS (64-bit) on the New Server
- Download the MAPS 64-bit setup software from the Evisions website, and then run the setup program to install MAPS. Note that you only need to do the installation steps at this time. Much of the configuration will be transferred from the old system in upcoming steps.
- Follow the initial prompts, and then select the Standalone Installation option when prompted to choose the configuration.
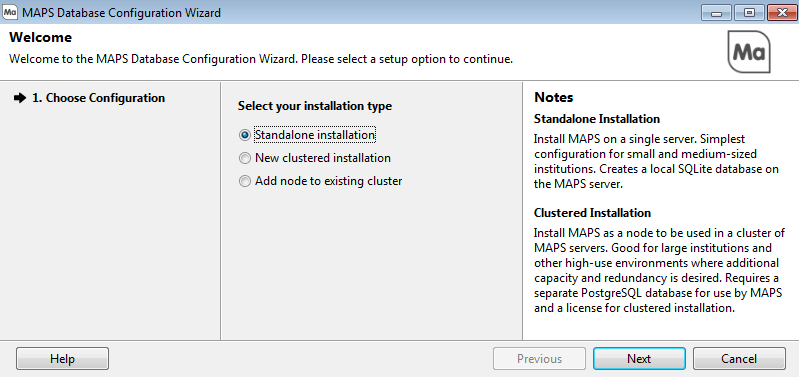
- When the Database Configuration Complete message displays, DO NOT select the Finish and Close Wizard at this time. You will do this step later, after the files are migrated from the existing 32-bit server to this new server.
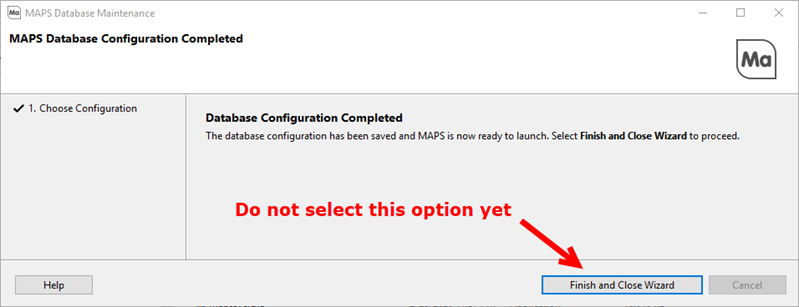
- Continue with the next section.
Copy Data Files from the Existing MAPS Server (32-bit) to the New 64-bit MAPS Server
The steps in this section assume that you have stopped the MAPS service on the 32-bit server, and you are using the default file locations for installations.
For each of the following, copy the files from the Program Files(x86)\Evisions\MAPS\Service folder on the 32-bit MAPS server to the Program Files\Evisions\MAPS\Service folder on the new 64-bit MAPS server.
Do not copy the whole Service folder as this may make the system unusable.
- Copy the contents of the Custom folder in the http_files folder.
- Copy the Applications folder.
- Copy the Certificates folder.
- Copy the Keys folder.
- Copy the Mapplets folder.
- Copy the Scripts folder.
- Copy the following files:
- MapsAudit.sqlite
- MapsData.sqlite
- MapsDataWarehouse.sqlite (if present)
Resume the Installation on the New MAPS 64-bit Server
- Return to the installation wizard on the new server.
- Select Finish and Close Wizard to complete the installation and database configuration. This should automatically start the MAPS service on the new server. If it doesn't start, do the following:
- Open the Services application (from Windows).
- Select the Evisions MAPS Service (64-bit) from the list, then select Start from the context menu.
Configure the New 64-bit MAPS Server
- Launch the MAPS launch page on the new server:
- Go to http://localhost:8080 and select MAPS Config.
- Before you log in, click on the Edit Servers link and change the Server address to the IP Address of your new server.
- Enter your credentials to log in.
- Select the Universal Launcher and select the "default" option. At the bottom of the menu, change the Server IP Address (or URL) to the IP Address or URL of the new 64-bit MAPS server then select Apply Changes.
- Immediately after logging in, if your existing MAPS server (32-bit) is still live do the following:
- Disable the MAPS Scheduler (on the new server) if it is active by navigating to Mapplets > Argos > Scheduling > Configuration and clearing the Scheduler active check box on the top of the menu.
- Disable the MAPS Email Queue (on the new server) if it is active by navigating to Email > Queue and clearing the Emailing active check box on the bottom left of the menu.
- Verify that the 64-bit version of MAPS Config is installed, and that the version is correct under Applications. The entry for the Configuration application should show (64 bit).
- Delete any entries for the Configuration application that are not marked as "64 bit."
- Open the Drivers list in the Data Connections section of MAPS Config. If there are any 32-bit drivers listed, do the following:
- Note the type of data connection for each 32-bit driver in the list.
- Delete each of the 32-bit drivers shown in the list.
- Close MAPS Config, and then relaunch it from the MAPS launch page to launch the 64-bit configuration tool.
- Navigate to the Data Connections list, and select Add Connection. Adding a data connection installs the new 64-bit version of the driver(s) that you deleted above.
- Select the data connection type that corresponds to one of the data connections that you are already using (typically REST or Salesforce).
- Select Next, then select OK. You can use the default properties for this connection since you are only adding it to install the new drivers.
- When you log in to Argos, FormFusion, or IntelleCheck, you should see all of the data from your previous server.
NOTE: If you do not disable the Scheduler and Email Queue, the schedule or email will also execute from the new server. When you are ready to retire the 32-bit server, enable the Scheduler and Email Queue on the new server.
Install the Database Provider
Install the Oracle OLE DB Provider
Refer to the Installing/Updating the Oracle OLE DB Provider document available from the Evisions support site for instructions.
Be sure to select the 64-bit versions of the files.
Installing Other Database Providers
Consult your database provider's documentation.
Configure the Data Connections on the 64-bit Server
- Launch MAPS Config.
- Select Data Connections from the left-hand pane and configure the data connections for the 64-bit server.
Install Additional Items
Install Printers and Drivers
You must reinstall printers and drivers for any other devices you want to use. Note that you should now use 64-bit drivers, when available.
Install SSL Certificates
To create a new certificate, see How to obtain a new Certificate for an HTTPS server. If you are using a wildcard certificate, then you can copy the certificate/key files to the new MAPS server and set up HTTPS. For additional information on how to install SSL certificates in MAPS, see Installing SSL Certificates in MAPS.
Update the Server Address Configured for SAML
Update the server URL:
- Using MAPS Config, select Single Sign-On from the left-hand pane.
- For each SAML server, update the Issuer field to show the address of the new MAPS server (64-bit).
Install the SQLite Driver for Data Warehouse
If you are reporting against the Data Warehouse, install the SQLite 64-bit OBDC driver.
See Reporting Against MAPS and Argos Databases for details.
Testing the Installation
Ensure that your are able to log in to the MAPS applications and that you see the expected data and environments.
When you are ready to move the new server into production, check the boxes to re-enable the scheduler and email queue.