Email Servers
The Email -> Servers screen is where you identify the email server(s) to be used with MAPS applications. For example, FormFusion output can be delivered via email. To use email in your applications, add your existing email server to MAPS by selecting Add Server at the top of the screen.
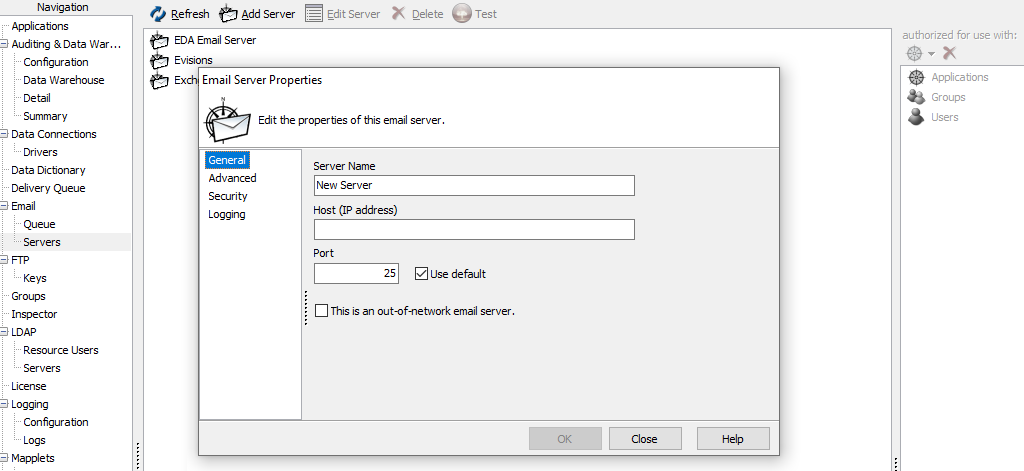
Email Server Configuration
The Email Server Properties dialog contains four screens:
General
Server Name: Enter an identifier for this email server. The name you specify here is how this mail server will be listed in the MAPS applications, and does not need to match the actual mail server name.
Host (IP address): The IP or host name of the mail server.
Port: The default port for SMTP is port 25. If your mail server uses a different port, enter the port number here.
Advanced

Client Name: The domain name that appears in the header data of the emails sent from MAPS. If you leave this field blank, it shows the MAPS server's domain name.
Maximum Emails Per Minute: Allows you to control the rate at which MAPS sends queued emails to your mail server. This can be useful when sending out large-volume mass mailings.
Security

SMTP Security Level: The type of security used by the mail server. The available options are auto-detect, none, login, OAuth, plain, DIGEST-MD5, CRAM-MD5, and CRAM-SHA1. When in doubt, the preferred setup is to use (auto detect) to let MAPS determine the security settings of your mail server.
Use TLS: Check this box if your mail server supports Transport Layer Security for email encryption. Some mail servers, such as Gmail's, require TLS. MAPS 6.2 and higher support TLS versions 1.0 and up. Earlier versions of MAPS only support TLS 1.0.
User Name/Password: Enter the credentials for the mail account to use.
OAuth2 authenticates via digitally created security keys instead of utilizing a username and password. When authenticating an email server using OAuth2, some additional fields become available.
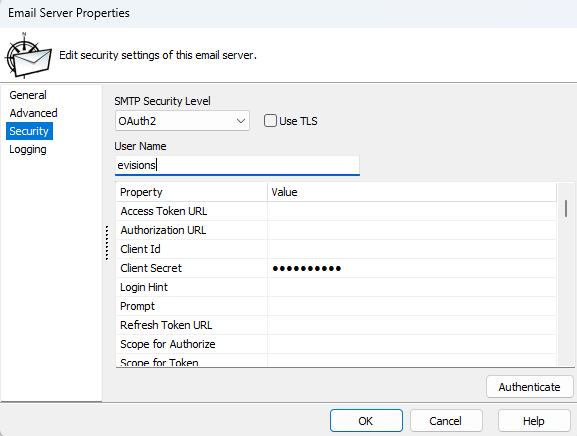
- Access Token URL - the URL to which an authorization code is exchanged for Access Tokens and Refresh Tokens. Depending on the OAuth2 provider, this may also be used for refreshing an Access Token.
- Authorization URL - the URL to which MAPS will send a request to receive an authorization code. This will typically be found in the Authentication section of your API documentation.
- Client Id - an ID unique to your email account. This ID is provided by an OAuth2 provider.
- Client Secret - a confidential value generated by the OAuth2 provider, used when obtaining or refreshing Access Tokens.
- Login Hint - (optional) pre-populates the user name on the sign-in page, if supported by the OAuth2 provider.
- Prompt - (optional) determines the type of sign-in interaction a user will receive when accessing the application.
- Refresh Token URL - (optional) the URL used by MAPS for refreshing an Access Token. If not provided, the Access Token URL is used instead.
- Scope for Authorize - the list of areas within the application to which access is being requested.
- Scope for Token - (optional) needed by some OAuth providers for requesting offline access. Some OAuth2 providers require offline access to be include within the scope in order to obtain a Refresh Token.
- Use HTTPS On Callback - if false, MAPS uses a Redirect URI value of `http://localhost:(available port)`. If true, HTTPS is used. This URI may need to be added to the OAuth2 provider's list of allowable Redirect URIs.
After these values are provided, select Authenticate. This will open a browser window that starts the OAuth2 flow. If successful, MAPS will have obtained the necessary tokens needed for sending an email. It is recommended that you send a test email to confirm that all values are correct.
Logging

Logging: Check this box to enable email logging.
Log filename: By default, all log entries, including email logs, reside in the main MAPS log file. Alternatively, enter a path and filename if you wish to store the email logs in a separate file. Using a separate log file helps to reduce the size of the MAPS logs and makes it easier to find the specific information you need.
Authorizing the Email Server
You can now authorize the email server for use by individual applications, users, and groups. Right-click in the Authorized for use with pane on the right (or use the dropdown menu) and choose Add Application, Add Group, or Add User. These options open a list of available users, groups, or applications that can be authorized for use with the selected email server.
Testing the Email Server
To make sure the newly added email server works correctly, select the Test button at the top of the Email Servers screen. Enter some parameters in the Test Email dialog, then select OK to send a test email.
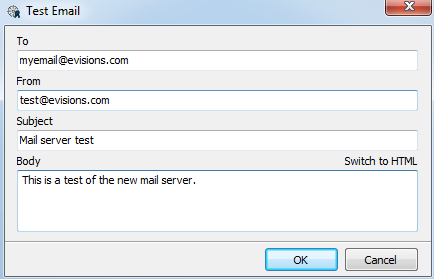
If you are entering multiple email addresses in the To field, separate the addresses using commas.
Email Queue
The Email -> Queue screen allows you to keep track of emails sent by MAPS or any of MAPS applications that have email capability. If all emails have been sent as intended, this list will be blank. MAPS will attempt to send an email four times. If it fails after the fourth try, the email will be held in the queue. Depending on the application, you can have the application specify to have these emails returned to sender. Several MAPS applications have the ability to queue an email to be sent at a later time. The date and time an email is scheduled to be sent is listed in the “Date to Send” column.
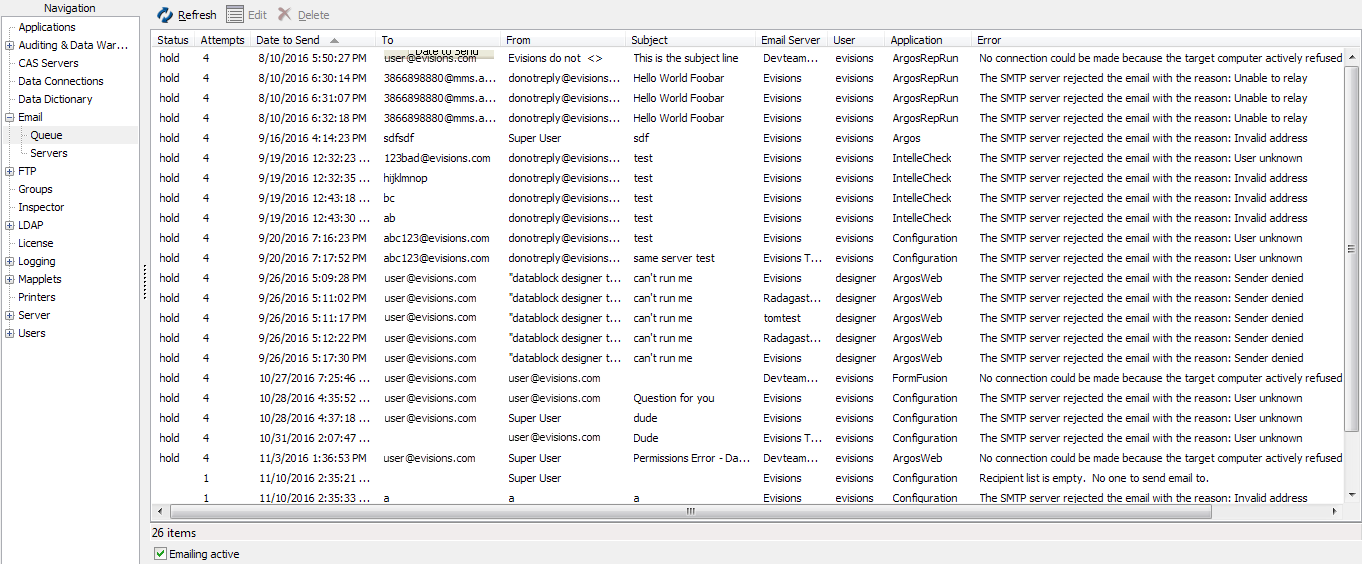
The Emailing active checkbox at the bottom of the screen controls whether MAPS is currently attempting to send emails or not. Unchecking the box will prevent any emails from being sent from any of the MAPS applications.
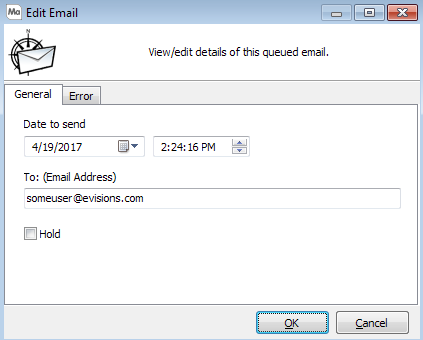
When an email is selected, clicking the Edit button brings up the Edit Email dialog shown below where you can override the date and time the email will be sent, and edit the email address if needed. Checking the Hold checkbox will hold the email in the queue and not send it.
Click the Error tab to view the error that caused the email to be sent to the queue.

In cases where you have a large number of emails to edit, you can use Shift or Control to select multiple emails at once. Editing emails this way will make the same changes to all of the selected emails.
If you want to configure notifications to alert you when emails from one or more applications are failing, you can do this on the