Configuring Users
Any individual who will be accessing a MAPS application must have a valid username and password to log in. The Users screen allows you to set up and configure individual MAPS and LDAP users.
If your institution has LDAP capability, users can be synchronized with the LDAP entries by adding them as a group. This gives you the advantage of not having to maintain individual permissions for your users, or do anything other than ensure they belong to the correct LDAP group. If a particular LDAP user needs different permissions, you can add them individually on a case-by-case basis. This section discusses creating individual users-- if you will be configuring LDAP groups, see Adding LDAP Groups.
Users can be added to MAPS in three ways:
- Create new MAPS users.
- Add individual LDAP users from an LDAP server.
- Import user information from a CSV file to create new MAPS users.
To create a new MAPS user, click the Add button at the top of the screen. Similarly, if you want to add an LDAP user, click the LDAP button.

Adding LDAP Users to MAPS
If you are adding an LDAP user, the first screen you see prompts you to Browse for LDAP Users. Select the LDAP server that you previously added to MAPS in the drop-down menu, then click Search.
If you want to use LDAP but have not yet set up your LDAP server in MAPS, refer to the LDAP Server Configuration section before adding LDAP users.
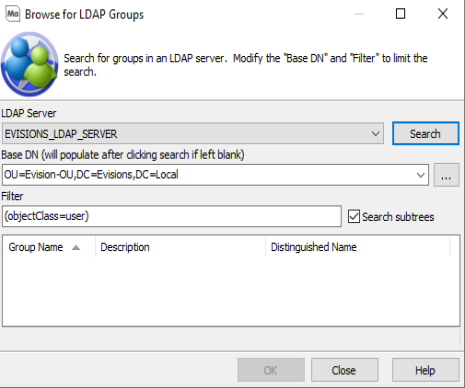
The drop-down on the Base DN field allows you to search for users within any configured user search base DNs.
Notice that the filter (objectClass=user) has been prepopulated, meaning that only objects of type "user" will be retrieved from the LDAP server.
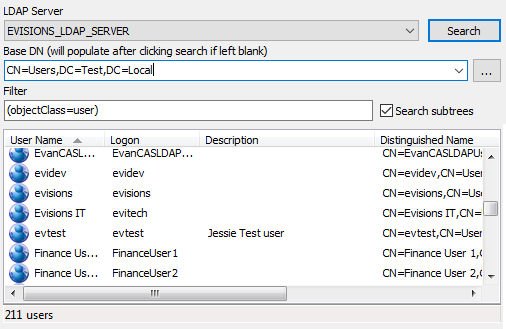
Select the user(s) you would like to add, then click OK. The selected users will be imported into the list of users in MAPS, with a circular LDAP icon to their left.
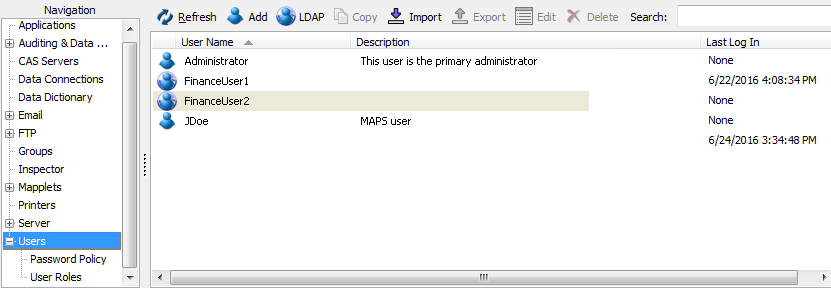
Double-click on each user to open the User Properties dialog and configure the settings for that user, as described in the following section. Configuration for MAPS and LDAP users is virtually identical once the LDAP user has been added to MAPS.
Configuring MAPS Users
Clicking the Add button launches the User Properties dialog, where you can enter the details for a new MAPS user. There are seven configuration screens within the user properties.
General
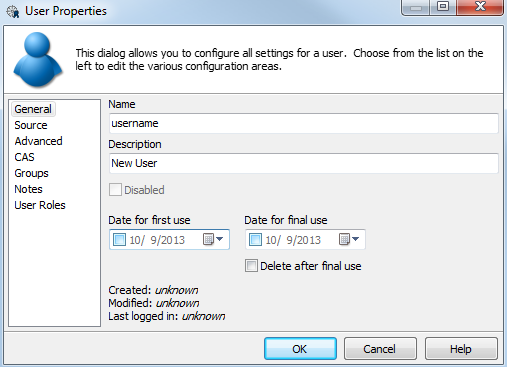
Name: The username for this user to log in to MAPS. Usernames should not have any spaces, and in most cases should match the username this person is already using to access the databases in your environment. For LDAP users, the username is retrieved from the LDAP server and should not be changed.
Description: This text will be used as the From address when this user sends emails from the MAPS application. For an individual, you can enter their name (with spaces). For a shared account, you may wish to use a department name, role, etc. For LDAP users, the description is retrieved from the LDAP server and should not be changed.
Disabled: Depending on your password policy, users who enter an incorrect password may be disabled after a certain number of failed login attempts. Disabled users will have a check in the Disabled box. MAPS administrators can manually reenable a user by unchecking the box. The password policy may also specify that the user will automatically be reenabled after a certain period of time.
Date for first/final use: If you check the appropriate box, you may specify a date range during which this user is able to log in. This can be useful if you are creating an account for a temporary employee, consultant, or other user who will not need permanent access.
Delete after final use: If this box is checked, this user will be deleted by the server once the Date for final use has passed.
Created/Modified/Last logged in dates: MAPS 4.2 and higher displays the creation date, last modified (by a MAPS admin) date, and the date the user last logged in. Users created or last modified/logged in under earlier versions of MAPS (or users who have never logged in) will show "unknown" in these fields.
Source
The Source screen differs depending on whether you are creating a MAPS user or adding an LDAP user.
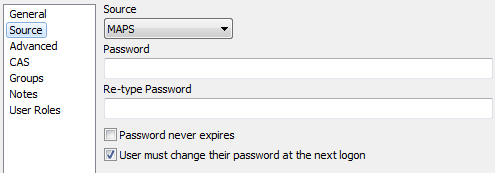
Source: Choose MAPS or LDAP. Changing the source changes the fields that are available on this screen.
Password: Enter an initial password for this user. You will need to provide the password to the user so they can log in and change it to a password of their choosing.
Re-type Password: Enter the same password to ensure it is correct.
Password never expires: Check this box to prevent the password from expiring. This setting overrides any expiry times set in the password rules. It can be useful for shared accounts or other situations where having to change the password periodically can be an inconvenience for a particular user.
User must change their password at the next logon: Check this box to require the user to change their password the next time that user logs in. It is a good idea to leave this box checked when creating a new user, asit prevents them from leaving the password set to the one chosen by the administrator.
If you want to use LDAP but have not yet set up your LDAP server in MAPS, refer to the LDAP Server Configuration section before adding LDAP users.
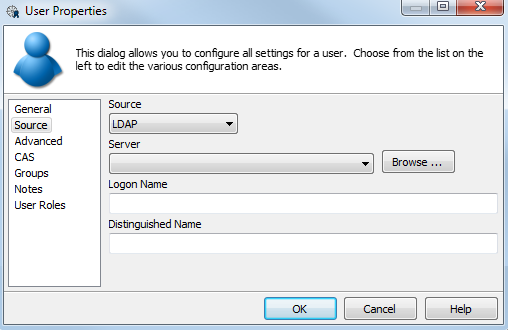
Source: Choose MAPS or LDAP. Changing the source changes the fields that are available on this screen.
Server: Choose the name of the LDAP server that you previously added to MAPS. Click the Browse button to browse for an LDAP user in the same manner as described earlier on this page.
Logon Name: This field displays the LDAP logon name and is populated via the Browse dialog. We recommend that you do not edit the value in this field.
Distinguished Name: This field displays the LDAP distinguished name and is populated via the Browse dialog. We recommend that you do not edit the value in this field.
Profile
Here you can configure a user's first and last name, as well as add a custom avatar if desired.

Advanced
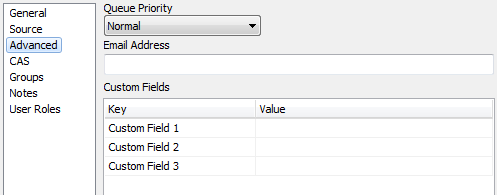
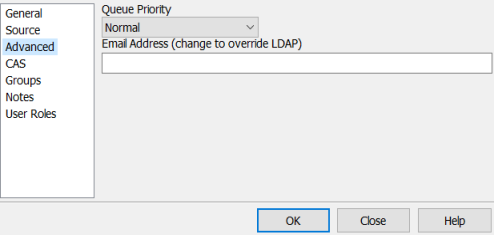
Queue Priority: A user's queue priority determines the order their queries are processed in relation to other users' queries when MAPS is handling a large number of concurrent jobs. You can control the maximum number of concurrent jobs via the Queuing Rules screen in the data connection. The available queue priorities for users are lowest, lower, normal, higher, and highest.
Email Address: Some MAPS applications have the ability to distribute output via email. For MAPS users, enter the user's email address. You do not need to enter the email address for LDAP users, although you can use this field to override the email address that comes from the LDAP server.
Custom Fields: MAPS Administrators can use these three fields to define custom properties for MAPS users. These fields contain static text. For LDAP users, custom fields are defined in the LDAP server configuration using existing attributes from the LDAP server. For both types of users, the custom fields can be accessed as variables in places such as the data connection username, connection and rule scripts, and as system variables within Argos. To reference a custom field in one of these locations, you would enter $User.CustomField1, $User.CustomField2, or $User.CustomField3. One use case for this would be to configure an Ellucian™ Banner®proxy account for each user.
Queue Priority: A user's queue priority determines the order their queries are processed in relation to other users' queries when MAPS is handling a large number of concurrent jobs. You can control the maximum number of concurrent jobs via the Queuing Rules screen in the data connection. The available queue priorities for users are lowest, lower, normal, higher, and highest.
Email Address: Some MAPS applications have the ability to distribute output via email. For MAPS users, enter the user's email address. You do not need to enter the email address for LDAP users, although you can use this field to override the email address that comes from the LDAP server.
CAS
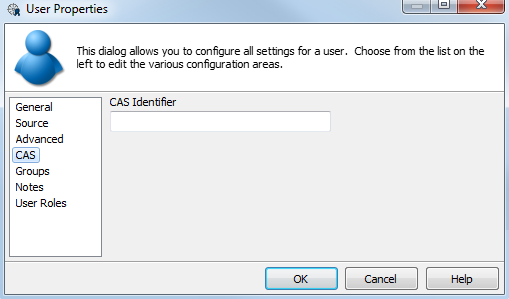
If you are authenticating users through CAS (Central Authentication Service), enter the CAS identifier for the user (the username that this person uses to log in to CAS). This associates the MAPS username with the CAS identifier and allows the user to log in with their CAS credentials. Each unique CAS identifier can only be used for one MAPS or LDAP user.
See CAS Servers to configure a CAS server that can be accessed by MAPS.
Groups
The Groups screen contains two lists of groups. The first pane lists the groups that this user is a member of. The second pane lists the groups that this user is not a member of. You can add the user to a group by selecting the desired group(s) and then dragging those groups over to the Member of list. Similarly, to remove a user from a group, drag the group back to the Not a member of list.
By default, all users are a member of the "Everyone" group. You cannot remove users from this group.
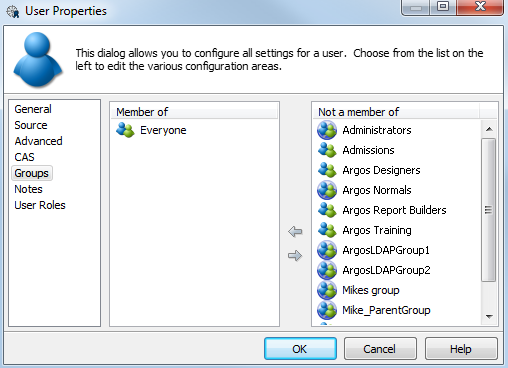
As with users, there are two types of groups. MAPS groups are groups that have been created in MAPS. LDAP groups are groups that were created on the LDAP server and then added to MAPS. LDAP groups have a circle around the group icon.
You can add LDAP users to MAPS groups and vice versa. It is important to note that the only reason to add a user to an LDAP group is to give that user (either MAPS or LDAP) the security permissions belonging to that group. Adding a user to an LDAP group in MAPS does not add that user to the group on the LDAP server or affect the LDAP server in any way
You can also add users to a group from the Group Properties dialog.
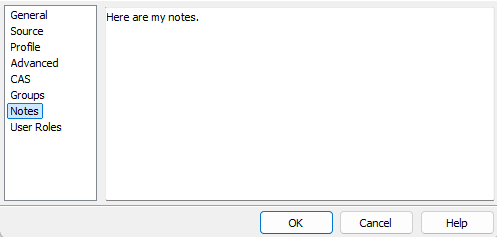
Notes
The Notes screen allows you to enter a text note that pertains to this user. The note does not appear anywhere in the MAPS applications and is not visible to the user.
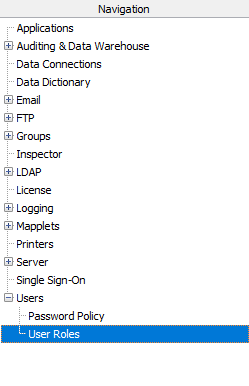
User Roles
Some MAPS applications support role-based security, which assigns users a set of permissions based on the role they perform when using the software. For example, Argos has four predefined user roles: Report Viewer, Report Writer, DataBlock Designer, and Argos Administrator. Each role is allowed to perform a specific set of operations within Argos. You can assign any number of user roles to a user or group. Users who are members of a group that has been assigned a particular user role inherit that role.
Users with multiple user roles have the combined permissions of all roles assigned to them.
When configuring a user, you can assign them any user role(s) needed via the User Roles screen in the user properties. You will see two lists of user roles. The first pane lists the roles that this user currently has. The second pane lists the roles that this user does nothave. To assign a role to the user, select the desired role(s) and then drag the role over to the Members list. Similarly, to remove a role from a user, drag the role back to the Available list.
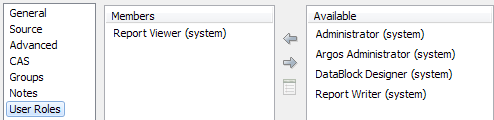
By default, all users are assigned the Report Viewer role. This role gives them basic permissions to run Argos reports in both the Windows client and the Argos Web Viewer. Note, however, that if you want a user to be able to log in to Argos you will still need to authorize them to use Argos on the Applications screen in MAPS, as well as make sure they can use the necessary data connection(s).
You can create custom user roles and manage existing roles from the User Roles screen in MAPS.